Scaling Synthetic Data Generation with Wirehead
Mike Doan, Sergey Plis
Aug 12, 2024
I. Issues with synthetic data generators
III. Configuration
IV. Deployment
VI. Advanced tech
VII. Wirehead Internals
There is one unchanging constant in machine learning: “data is king.” But what happens when you work in a field where the king doesn’t always want to get out of bed every morning?
Welcome to neuroimaging, where data is not only hard to come by, impossible to get manually labeled1, but also requires a ton of space2.
Many have stood up to challenge this lack of data by inventing methods to generate synthetic data — SynthSeg, SynthStrip, Synth, etc. They work really well3, but it has …
I. Issues
If you’d like to skip ahead to the tutorial, go to section II. If you’d like to skip ahead to Wirehead’s internal workings, go to section VII.
In late 2023, we at TReNDS attempted to make use of one such generator, SynthSeg, to replicate the original results by training a MeshNet, our parameter-efficient model that’s very different from UNet used in the reference paper, on 300,000 synthetic samples3. However, early into the experimentation process, we noted three key things:
- Generation time was quite significant (2 seconds per sample on our A40). Generating that many samples using their setup (train -> generate) would have taken us hundreds of hours.
- Data size was massive, the papers report training on 300,000 samples, which would have been 91 terabytes at 32 bit precision .
-
Hardware was greatly underutilized. glancing at nvtop showed us that our GPUs would be barely used during sample generation, before peaking for about 5 seconds while training on a new batch. On average, we got just around 30% GPU utilization
We could solve these issues by deploying the generator in parallel, but that posed its own set of issues:
- Where would we store the data? We still only had that much space on the cluster, and storing all of them at once would be infeasible. Some kind of cache was necessary.
- How would we coordinate these distributed generators? We had SLURM, and could spin up 20 generators on the spot whenever we wanted, but it’s nontrivial to figure out how to make this process sync up with the training process.
- How would we maintain high GPU utilization for training? The problem was clear — Our GPUs would idle if they didn’t have a sample to train on. Perfectly syncing up the throughput of generation to training is practically impossible, and overloading the training job with more samples than it needs would be wasteful of compute. So a workaround had to be figured out.

(pictured: physical analogy of wirehead)
II. TLDR (how to solve this problem without thinking about it)
In short, we made Wirehead, a distributed, async cache that lets you arbitrarily scale your synthetic data generation. It does this with no net storage overhead, and minimal compute requirements. If you’d like to follow along the unit tests and examples from our repo, go here.
/
1. Install MongoDB
This is the only real dependency we have for wirehead. Here are some ways to get it up and running on a local instance or a cluster.
Important note: the following instructions are for development and testing purposes only. for production deployments, please refer to the official mongodb documentation for secure and proper installation guidelines.
a. Quick MongoDB Setup (Ubuntu):
sudo apt-get install gnupg curl
curl -fsSL https://www.mongodb.org/static/pgp/server-7.0.asc | \
sudo gpg -o /usr/share/keyrings/mongodb-server-7.0.gpg \
--dearmor
echo "deb [ arch=amd64,arm64 signed-by=/usr/share/keyrings/mongodb-server-7.0.gpg ] https://repo.mongodb.org/apt/ubuntu jammy/mongodb-org/7.0 multiverse" | sudo tee /etc/apt/sources.list.d/mongodb-org-7.0.list
sudo apt-get update
sudo apt-get install -y mongodb-org
# Run MongoDB
sudo systemctl start mongod# Stop MongoDB
sudo systemctl stop mongodb. Quick MongoDB Setup (MacOS):
Install homebrew if you haven’t:
/bin/bash -c "$(curl -fsSL https://raw.githubusercontent.com/Homebrew/install/HEAD/install.sh)"
brew tap mongodb/brew
brew update
brew install mongodb-community@7.0
# Run MongoDB
brew services start mongodb-community@7.0# Stop MongoDB
brew services stop mongodb-community@7.0c. Singularity setup
Refer to this excellent guide from Tristan Holoday.
2. Python environment setup
For SLURM usage, do be mindful of where your conda or venv is, and how to activate it, as we will need to reliably pass that through to our sbatch jobs.
# Note:
# python version doesn't necessarily have to be 3.10
# but this gives better support for some generation pipelines

# Conda
conda create -n wirehead python=3.10
conda activate wirehead

# venv
python3.10 -m venv wirehead
source venv/bin/activate
3. Install wirehead
pip install wirehead4. Doing a test run
The unit test lives in examples/unit:
git clone git@github.com:neuroneural/wirehead.git
cd wirehead/examples/unit
Configure the config.yaml file:
MONGOHOST: "localhost" # hostname or ip of node hosting mongodb
DBNAME: "unit-test"    # name of database inside mongodb
SWAP_CAP: 10           # max size for write/read collection
Important note: If you’re running MongoDB on a separate computer, you should make sure that it is accessible to wherever you’ve deployed wirehead. (This usually means contact your sysadmins). Verify with:
from pymongo import MongoClient
# replace with hostname=localhost and port=27017 for defaults on a local instance
print("MongoDB is accessible" if MongoClient(
    host="your_hostname",
    port=your_port, serverSelectionTimeoutMS=2000
    ).server_info() else "MongoDB is not accessible")
Run the test
chmod +x test.sh
./test.sh
If tests pass, you should get:
All tests passed successfully!
III. Configuration
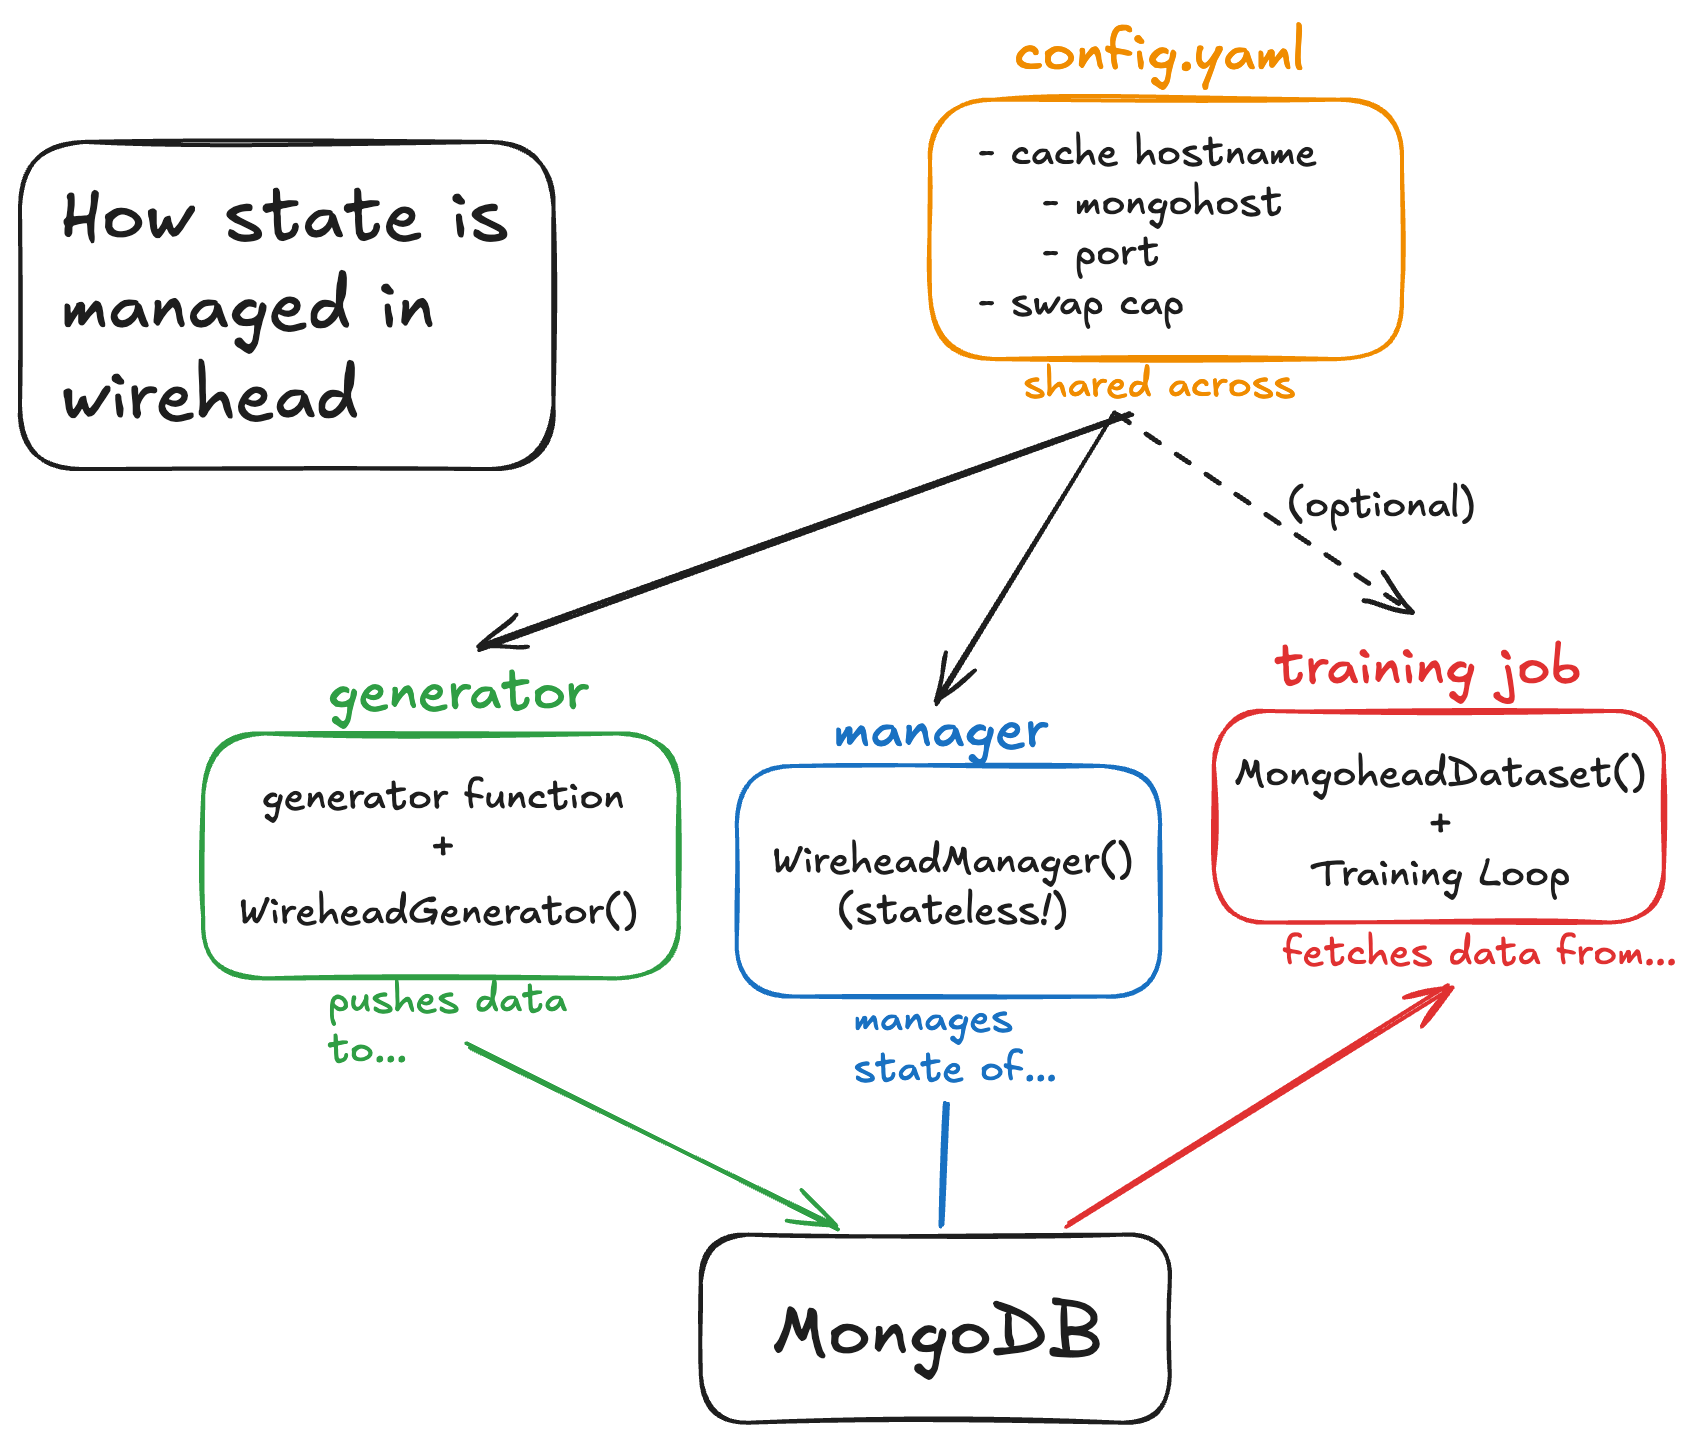
Deploying wirehead involves 3 main scripts (or utilities): A generator(s) (generator.py) a cache manager (manager.py) and a data fetcher (loader.py). In fact, loader is basically your favorite model training script and is fully decoupled from wirehead as long as you use our Dataset class (provided, but also part of our other package mindfultensors). All examples in this section can be found in wirehead/examples/unit.
1. config.yaml
All three of these scripts source a single config.yaml file, which consists of:
MONGOHOST: "localhost"          # hostname or ip of node hosting mongodb
DBNAME: "unit-test"             # name of database inside mongodb
SWAP_CAP: 10                    # max size for write/read collection
as well as some advanced configs (explained in a later section).
SAMPLE: ["data", "label"]       # string key associated with your samples
WRITE_COLLECTION: "write"       # name of write collecion on mongodb
READ_COLLECTION: "read"         # name of read collection
COUNTER_COLLECTION: "counter"   # name of counter collection used to keep index
TEMP_COLLECTION: "temp"         # name of temporary collection for movement ops
CHUNKSIZE: 10                   # size of chunks in MB for chunking data
In order of increasing complexity, here’s how to configure each component of wirehead:
2. manager.py
This is the simplest, and doesn’t have to be changed if you’re running it as a standalone script.
WireheadManager doesn’t consume much compute, and thus can be deployed anywhere you want.
The only thing you need to specify is the path to your config file (in this case, “config.yaml”).
from wirehead import WireheadManager

if __name__ == "__main__":
    wirehead_runtime = WireheadManager(config_path="config.yaml")
    wirehead_runtime.run_manager()
3. loader.py
This script provides a simple way, an example really, to fetch a single sample from Wirehead
We provide two kinds of datasets for fetching dataL MongoheadDataset (dictionary-like) and MongoTupleheadDataset (tuple-like).
Similar to manager.py, it’s pretty much plug and play, and you can insert this into anywhere you’d like in your regular training script. the only thing you need to specify is the path to your config file (again, it is “config.yaml” in this example).
import torch
from wirehead import MongoheadDataset, MongoTupleheadDataset

idx = [0]

dict_dataset = MongoheadDataset(config_path="config.yaml")
data = dataset[idx]
sample, label = data[0]['input'], data[0]['label']

tuple_dataset = MongoTupleheadDataset(config_path="config.yaml")
data = dataset[idx][0]
sample, label = data[0], data[1]
4. generator.py
This is the heart of the operation, and where some explanation has to be done:
import numpy as np
from wirehead import WireheadGenerator

def create_generator():
while True:
        img = np.random.rand(256,256,256)
        lab = np.random.rand(256,256,256)
yield (img, lab)

if __name__ == "__main__":
    brain_generator     = create_generator()
    wirehead_runtime    = WireheadGenerator(
        generator = brain_generator,
        config_path = "config.yaml"
    )
    wirehead_runtime.run_generator()
Like the manager and dataset, you need to specify your config_path (“config.yaml” in this example).
But one thing that’s different, is that now you also have to specify a generator function which yields a tuple containing your data. In this case, that generator looks like:
def create_generator():
while True:
        img = np.random.rand(256,256,256)
        lab = np.random.rand(256,256,256)
yield (img, lab)
Wirehead has to serialize the data before sending it off, and in this case we decided to use numpy ndarrays. If you instead wanted to use torch tensors or some other data type, make sure they’re serializable and live in the CPU before yielding them.
Then, all you have to do is plug an instance of your generator function, and the path to your config file into WireheadGenerator.
brain_generator     = create_generator()
wirehead_runtime    = WireheadGenerator(
    generator = brain_generator,
    config_path = "config.yaml"
)
And then press play (this runs an infinite loop).
wirehead_runtime.run_generator()If you’d prefer to generate only N samples instead of running an infinite loop, you can specify that in your generator function:
N = 10000
def create_generator():
for _ in range(N):  # generate 10000 samples
        img = np.random.rand(256,256,256)
        lab = np.random.rand(256,256,256)
yield (img, lab)
WireheadGenerator will continue to push samples to the write collection as long as there are samples to yield. If your generator function fails or otherwise stops yielding, WireheadGenerator will self terminate.
IV. Deployment
Wirehead can be deployed both locally and on a SLURM managed cluster.
This section will guide you through both deployment scenarios.
1. Local
For local deployment, you’ll need to run three main components: the generator, the manager, and your training script (which uses the loader). Here’s a step-by-step guide:
a. Start MongoDB:
Ensure MongoDB is running on your local machine. If it’s not already running, start it using the appropriate command for your operating system (e.g., sudo systemctl start mongod on Ubuntu).
b. Run the manager: In a terminal, navigate to your Wirehead directory and run:
python manager.py
c. Run the generator: Open another terminal, navigate to your Wirehead directory, and run:
python generator.py
d. Run your training script: In a third terminal, run your training script that uses the Wirehead loader.
Make sure all scripts are using the same configuration file (config.yaml) pointing to your local MongoDB instance.
2. SLURM
For deployment on a SLURM-managed cluster, you’ll need to create SLURM job scripts for the manager and generator. Your training script will also need to be submitted as a SLURM job. Here’s how to set it up:
a. Manager Job Script:
Create a file named manager_job.sh:
#!/bin/bash
#SBATCH --job-name=wirehead_manager
#SBATCH --nodes=1
#SBATCH -c 2
#SBATCH --mem=4g
#SBATCH --output=./log/manager_output_%j.log
#SBATCH --error=./log/manager_error_%j.log
#SBATCH --time=24:00:00
#SBATCH -p qTRDGPU
#SBATCH -A psy53c17

echo "Starting Wirehead Manager on $(hostname)"
conda activate wirehead_dev
python manager.py
b. Generator Job Script:
Create a file named generator_job.sh:
#!/bin/bash
#SBATCH --job-name=wirehead_generator
#SBATCH --nodes=1
#SBATCH -c 16
#SBATCH --mem=50g
#SBATCH --gres=gpu:A40:1
#SBATCH --output=./log/generate_output_%A_%a.log
#SBATCH --error=./log/generate_error_%A_%a.log
#SBATCH --time=06:00:00
#SBATCH -p qTRDGPU
#SBATCH -A psy53c17
#SBATCH --array=0-2

echo "This is a Wirehead generator job on $(hostname)"
conda activate wirehead_dev
python generator.py
c. Submit the jobs: First, submit the manager job:
sbatch manager_job.sh
Then, submit the generator job:
sbatch generator_job.sh
d. Training Job: Modify your training script to use the Wirehead loader, and submit it as a SLURM job.
Notes on the SLURM configuration:
- The manager job is set to run for 24 hours. Adjust this time as needed for your workload.
- The generator job is set up as an array job (—array=0-2), which will create 3 identical jobs. This allows you to run multiple generators in parallel.
- Both jobs use the qTRDGPU partition and the psy53c17 account. Adjust these according to your cluster’s configuration.
- The generator job requests an A40 GPU. Modify this according to your available hardware.
- Both jobs activate a conda environment named ‘wirehead_dev’. Ensure this environment exists and contains all necessary dependencies.
Remember to modify the config.yaml file to point to the MongoDB instance on your cluster. You may need to work with your system administrators to ensure MongoDB is properly set up and accessible from your compute nodes.
By using this SLURM setup, you can easily scale your data generation across multiple nodes, significantly speeding up your workflow.
V. Case study — SynthSeg
Recall this diagram. This section will be discussing the use of wirehead for scaling SynthSeg data generation.
First, let’s start with a baseline: (running SynthSeg generation on a loop and measuring the samples per second)
1. Baseline
We need to modify our generator.py script to accept the SynthSeg generator:
from time import time
from nobrainer.processing.brain_generator import BrainGenerator
from preprocessing import preprocessing_pipe # just simple label maps and normalization

DATA_FILES = ["example.nii.gz"]

def create_generator(file_id=0):
"""Creates an iterator that returns data for mongo.
    Should contain all the dependencies of the brain generator
    Preprocessing should be applied at this phase
    yields : Tuple(np.ndarray, np.ndarray)
    """
    training_seg = DATA_FILES[file_id]
    brain_generator = BrainGenerator(
        training_seg,
        randomise_res=False,
    )
print(f"Generator {file_id}: SynthSeg is using {training_seg}", flush=True)
    start = time() # for benchmarking
while True:
        img, lab = preprocessing_pipe(brain_generator.generate_brain())
yield (img, lab)
        gc.collect() # for memory stability, will be important later
print(f"Time diff : {start - time()}")
        start = time()

if __name__ == "__main__":
    brain_generator = create_generator()
    wirehead_generator = WireheadGenerator(
        generator=brain_generator, config_path="config.yaml"
    )
    wirehead_generator.run_generator()
Basically, the exact same thing as the example above, just with some extra stuff for preprocessing, and feeding in a special data file for conditioning the generator.
For comparison reasons, we’ll be measuring using the time between swaps. Spinning up an instance of that gives us the following times:
Manager: Time: 1722892244.7662659 Generated samples so far 100
Manager: Time: 1722892408.0713165 Generated samples so far 200
Manager: Time: 1722892570.7747226 Generated samples so far 300
Manager: Time: 1722892734.1165183 Generated samples so far 400
Subtracting time between swaps, we get on average 162 seconds per 100 samples, or 1.62 seconds per sample (0.62 samples per second). This is now our baseline.
For reference, let’s also check out the hardware utilization plots, this is nvitop btw
Notice anything?
- GPU util: bottom right plot: Spotty, varying from 0-80%, averaging 30% — WEAK
- GPU mem: top right plot. stable 11% — WEAK
- CPU util: top left plot ~9% — WEAK
- CPU mem: bottom left plot 9.4 GB — WEAK
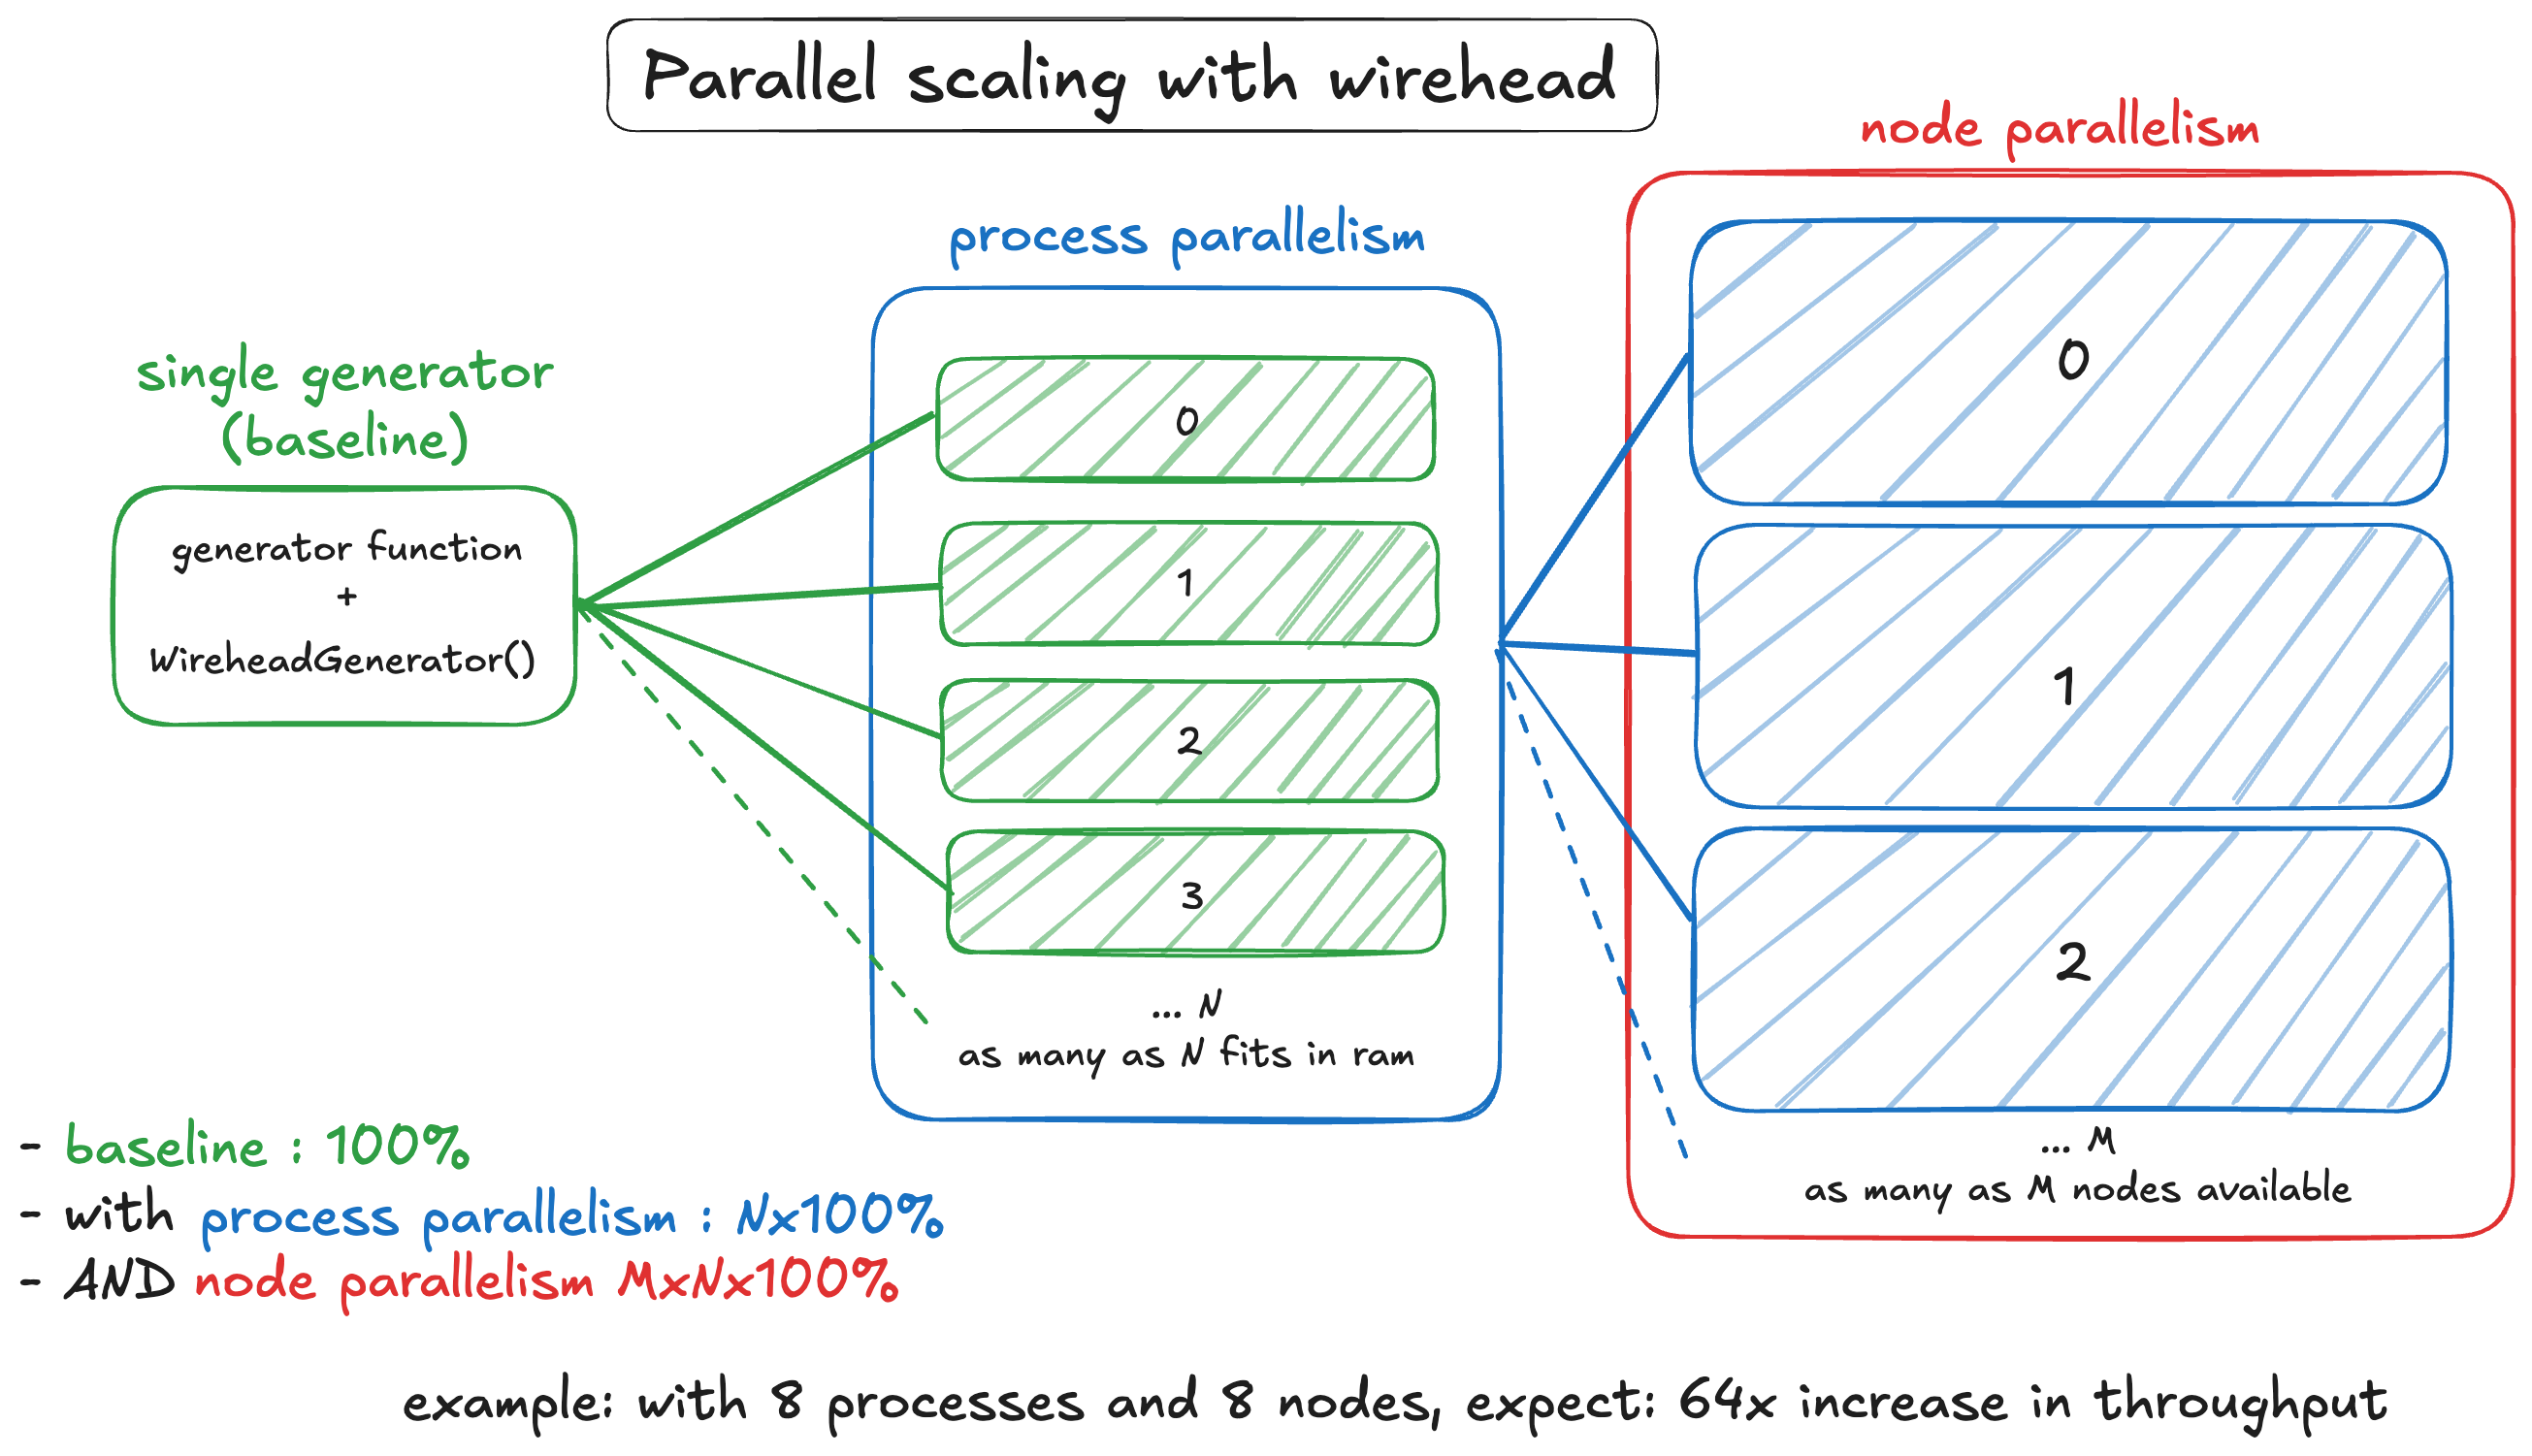
2. Process parallelism
Surely we can fit more processes on the same node. How about 8?
We can do this by just launching 8 python processes in parallel in the terminal:
#!/bin/bash

NUM_GENERATORS=8
conda init bash
conda activate wirehead

for i in $(seq 0 $((NUM_GENERATORS-1))); do
python generator.py $NUM_GENERATORS $i &
    pids+=($!)
done

for pid in "${pids[@]}"; do
wait $pid
done
Doing this nets us these times:
Manager: Time: 1722891632.5399084 Generated samples so far 100
Manager: Time: 1722891671.506585 Generated samples so far 200
Manager: Time: 1722891710.6051934 Generated samples so far 300
Manager: Time: 1722891749.7454906 Generated samples so far 400
On average, we’re getting about 39 seconds per 100 samples. This means the generator is going at 0.39 seconds per sample (aka 2.56 samples per second). This translates to a 4.1x speedup. Not quite linear, but SynthSeg is quite resource intensive so.
Let’s look at the hardware util plots again:
Notice anything?
- GPU util: bottom right plot: > 90% utilization always — STRONG
- GPU mem: top right plot. 77.7% — STRONG
- CPU util: ~23% — STRONGER
- CPU mem: 24 GB — STRONG
3. Node paralellism
Let’s kick it up a notch. We can deploy multiple jobs in parallel using SLURM, how about we fire up 8 jobs?
#!/bin/bash

#SBATCH --job-name=wirehead
#SBATCH --nodes=1
#SBATCH -c 64
#SBATCH --mem=128g
#SBATCH --gres=gpu:A40:1
#SBATCH --array=0-7 # this means 8 nodes will be allocated

NUM_GENERATORS=8
conda init bash
conda activate wirehead

for i in $(seq 0 $((NUM_GENERATORS-1))); do
python generator.py $NUM_GENERATORS $i &
  pids+=($!)
done

for pid in "${pids[@]}"; do
wait $pid
done
drum rolls please here’s the numbers:
Manager: Time: 1722969207.606956 Generated samples so far 30000
Manager: Time: 1722969256.0353918 Generated samples so far 31000
Manager: Time: 1722969305.0466542 Generated samples so far 32000
So an average of about 0.049 seconds per sample or 20.4 samples per second. So about a 32x speedup compared to baseline, and a LINEAR 8x speedup compared to the process parallel example.
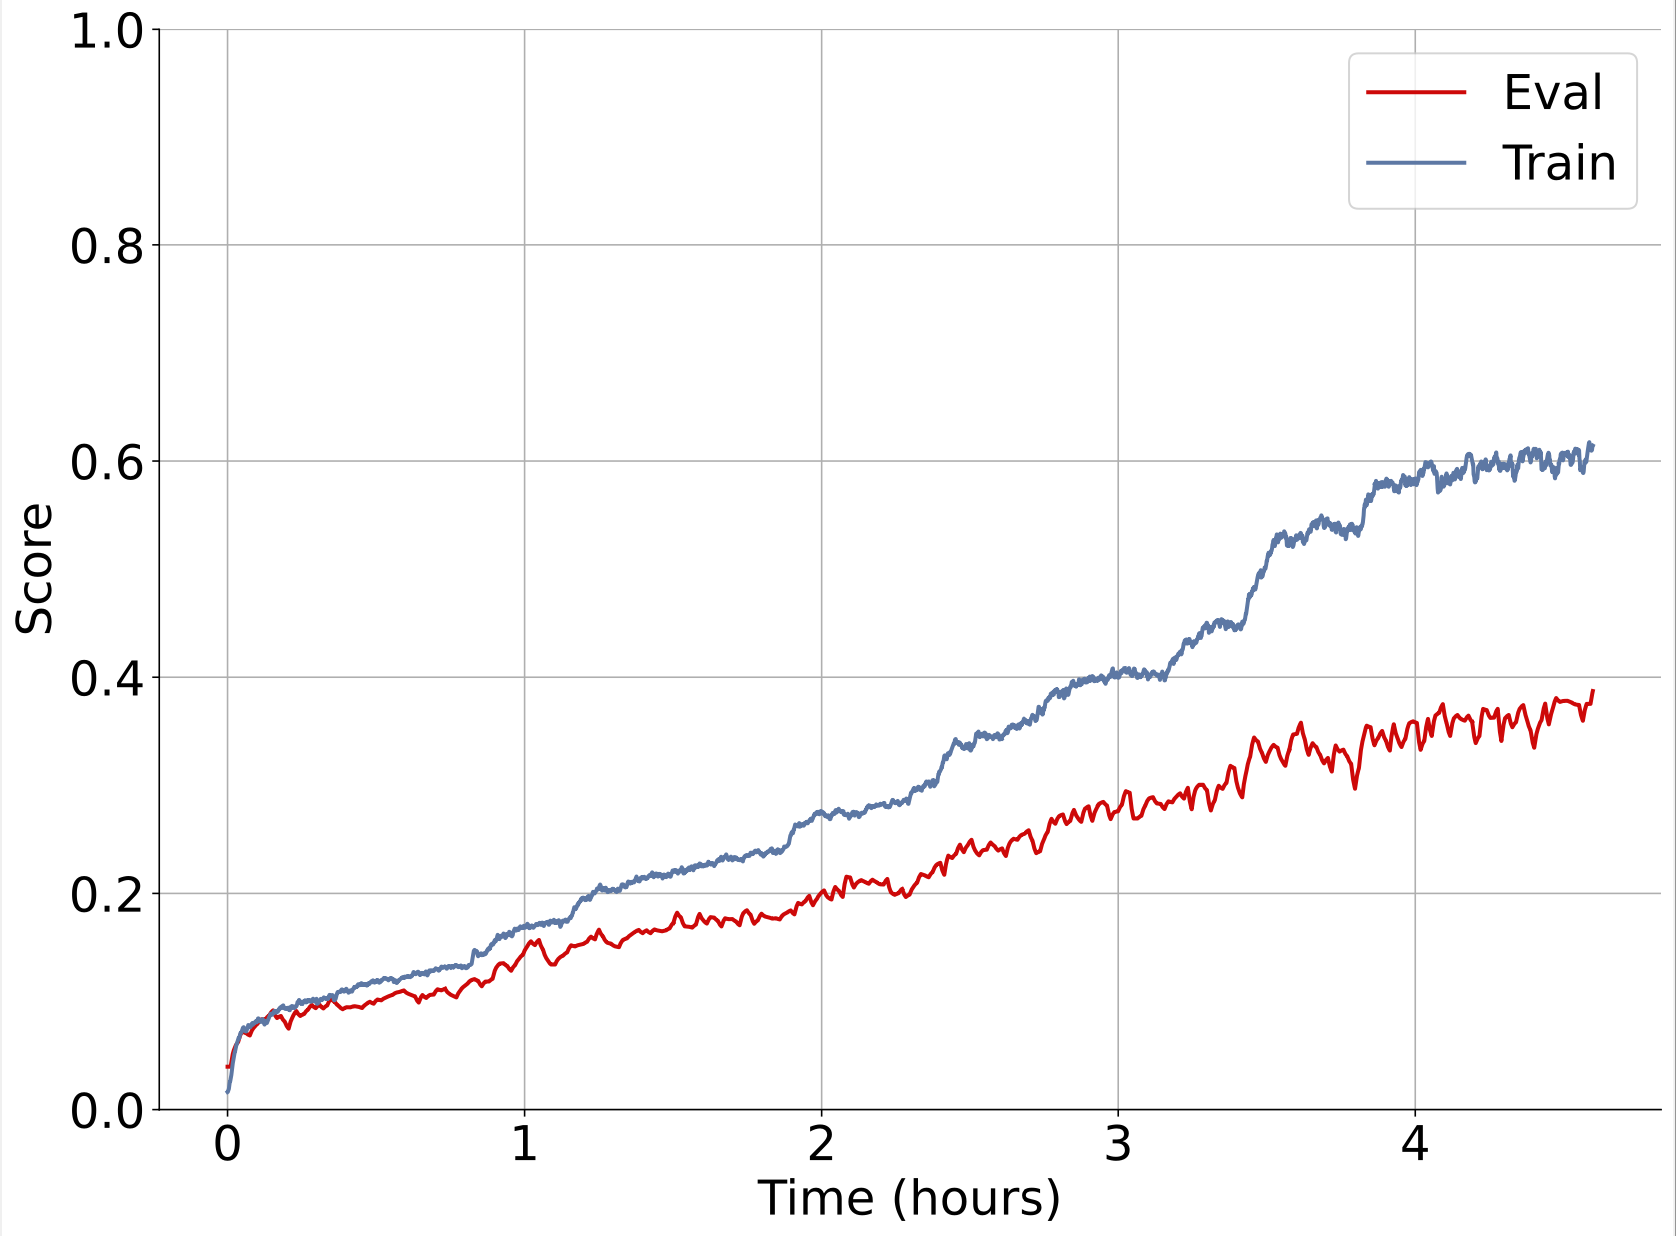
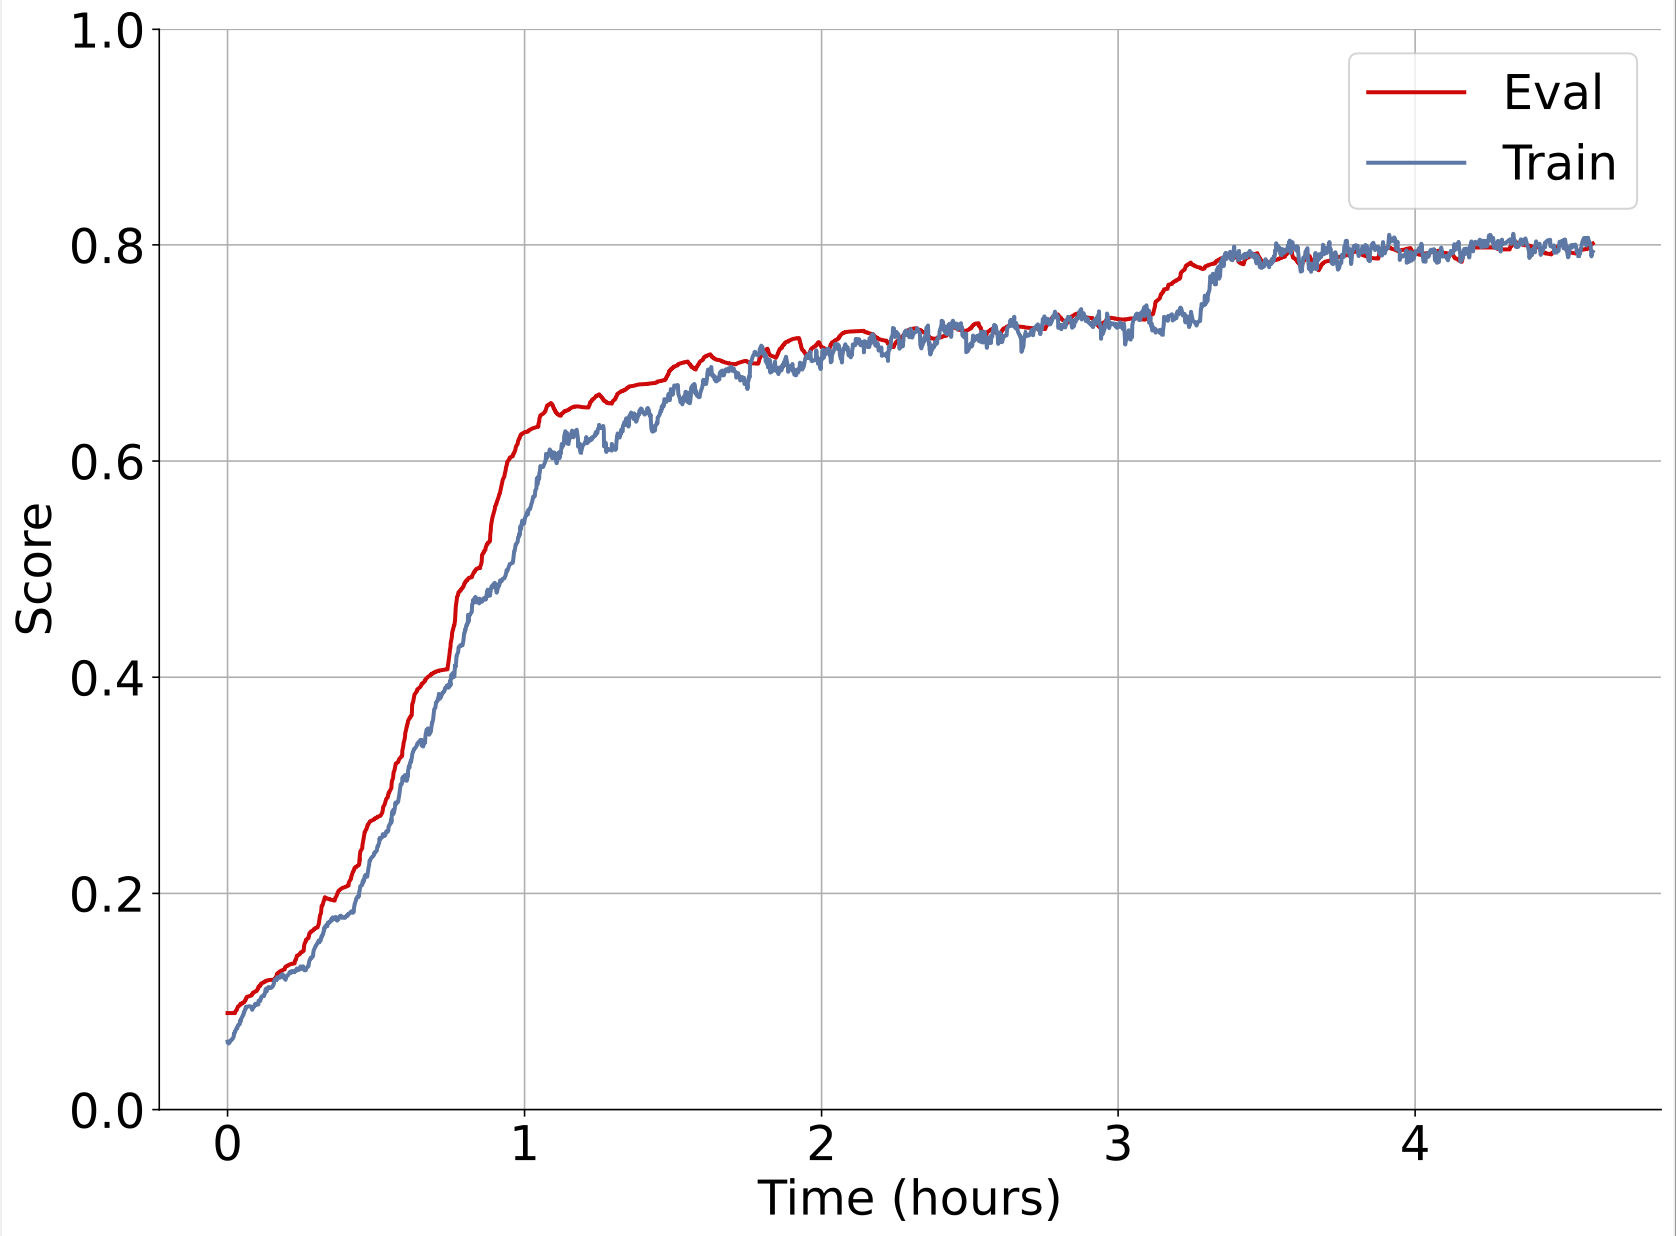
Here’s an example of one of our experiments training on synthetic data with wirehead. Left plot is unoptimized, single node synthseg. Right plot is multi node, multi node wirehead.
Both are training on the same hardware (1xA100).
With a faster data generation rate, a node parallel wirehead session serving a training process on the same GPU in just 40 minutes can achieve better results than a training session served by a non-parallel wirehead session that runs for 4 hours.
Warning: Advanced Section Ahead
The following section is intended for users who are already comfortable with deploying and using wirehead for normal training jobs. None of these are necessary for normal usage of wirehead, but might be necessary for experiments with scaling using wirehead, as well as benchmarking and debugging purposes.
VI. Advanced userland tech
So far, Wirehead might seem quite barebones, having basically just the minimum to function as a reliable distributed data structure. We decided to leave many of the decisions (such as how to manage and schedule generators) to the end user. Accommodating all the different ways a generator could be handled, or deployed, would have significantly bloated our code.
However, that doesn’t mean we’re going to leave you out to dry.
Here are some advanced tech that we’ve found during testing to make your life a lot easier while scaling your synthetic data generators:
1. Slurm tricks
The first and most obvious one is to leverage many of the features that slurm provides out of the box to avoid having to having to heterogenize your generators.
- Slurm arrays for scheduling parallel jobs:
Example:
#!/bin/bash

#SBATCH --job-name=wirehead
#SBATCH --nodes=1
#SBATCH --gres=gpu:A40:1
#SBATCH --array=0-19  # << this lets you run 20 jobs in parallel, indexed 0..19

python worker.py
You can also use the slurm worker_id (the index from the example above) within the python runtime. This is useful for selecting:
import os
worker_id = os.getenv("SLURM_ARRAY_TASK_ID", "0")
training_seg = DATA_FILES[worker_id % len(DATA_FILES)] # selects a different segment to condition based on id
2. Running multiple python processes
Assuming you don’t have egregious memory leaks, you can also deploy multiple generators in parallel in multiple python processes4
#!/bin/bash

#SBATCH ...

NUM_GENERATORS=8
conda init bash
conda activate wirehead

for i in $(seq 0 $((NUM_GENERATORS-1))); do
python generator.py $NUM_GENERATORS $i &
  pids+=($!)
done

for pid in "${pids[@]}"; do
wait $pid
done
3. Benchmarks and debugging
a. Fetching single samples
You can do this by using the MongoheadDataset class:
(venv) examples/unit § python
Python 3.10.14 (main, Jul 12 2024, 17:45:26)
Type "help", "copyright", "credits" or "license" for more information.
>>> from wirehead import MongoheadDataset

>>> dataset = MongoheadDataset("config.yaml")
Dataset: config loaded from config.yaml
Dataset: Data is ready

>>> x, y = batch[0]['input'], batch[0]['label']

>>> x.shape, y.shape
(torch.Size([256, 256, 256]), torch.Size([256, 256, 256]))
b. WireheadManager will provide some logging information
Manager: SWAP!
    Time: 1722356716.8162937
    Generated samples: 4800
    Documents deleted: 0
Manager: SWAP!
    Time: 1722356737.930378
    Generated samples so far 4850
    Documents deleted: 10
c. How to interpret results
Every time there is a swap, the manager will log:
Time:               current unix time
Generated samples:  how many samples generated in total so far
Documents deleted:  how corrupted / incomplete samples were thrown away
You can use these logs to get some figures for benchmarking:
>>> 1722356737.930378-1722356716.8162937
21.114      # seconds between swaps
>>> 4850-4800
50          # samples between swaps
>>> 50/21.114084243774414
2.368       # samples per second
>>> 21.114084243774414/50
0.422       # seconds per sample
VII. Wirehead Internals
So we looked at this problem and realized: What we need is a distributed5 circular6 cache7. We made one, and called it Wirehead.
Okay what do you need for a cache? You basically just need:
- A way to put data in.
- A way to get data out.
- A way to swap old data with fresh data.
Why a cache? And not some other strategy? Well, a circular cache:
- Eliminates the storage issue. Using a cache means we toss out the data after we’re done using it for training.
- Provides a convenient way to deal with the coordination issue. Using a cache means that we have a way to hook up our many generators to our training job.
- Eliminates the issue of low GPU utilization. Our training job would always have samples to train on.
Now the thing though, is that writing distributed systems software is hard. If we did this from scratch, it would likely crash and burn every 5 minutes.
So we didn’t, and instead relied on some battle hardened enterprise software. Enter MongoDB — distributed, non-blocking, and basically nuclear proof. It was exactly what we needed.
So all we have to do now is to write those three components, and let MongoDB handle the ugly details of distributed systems reliability. (not really true, we still have to do some careful distributed system design).
Some terminology before we dive into the explanations:
- swap time: refers to the operations and time during which swap from write to read happens.
- read time: refers to the operations and time during which a read operation happens.
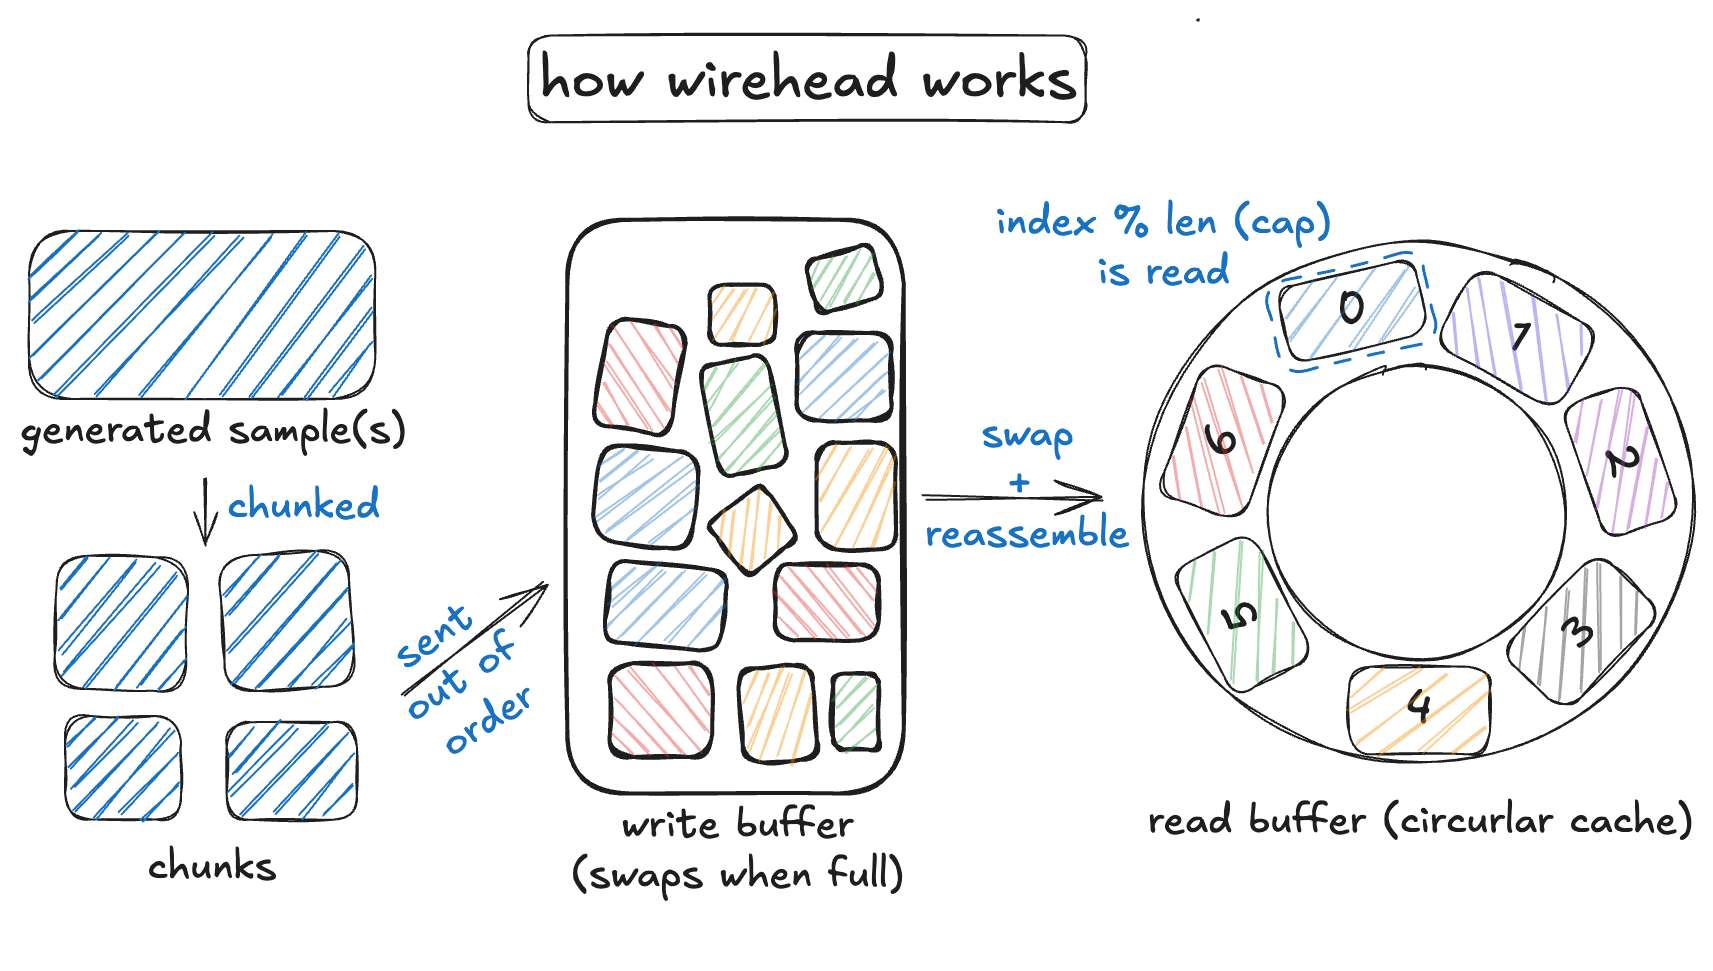
- chunkified: turning a large file of N bytes into N / CHUNKSIZE chunks.
Here are the parts that we wrote, and a brief explanation of how they work.
1. Put
def generate_and_insert(self):
""" Fetch from generator and inserts into mongodb """
# 0. Fetch data from generator
    data = next(self.generator)
# 1. Get the correct index for this current sample
    index = self.get_current_idx()
# 2. <<<< Turn the data into chunks >>>>
    chunks = self.chunkify(data, index)
# 3. Push to mongodb + error handling
if index < self.swap_cap:
        self.push_chunks(chunks)
For every sample created by a generator, the following steps are applied to that data:
- A corresponding index is fetched for the sample.
- The data is turned into chunks of CHUNKSIZE megabytes.
- The chunks are pushed in order into MongoDB. (to be reassembled later)
a. What is index?
def get_current_idx(self):
"""Get current index of sample in write collection"""
    dbc = self.db[self.collectionc]
    counter_doc = dbc.find_one_and_update(
        {"_id": "uniqueFieldCounter"},
        {"$inc": {"sequence_value": 1}},
        return_document=ReturnDocument.BEFORE,
    )
return counter_doc["sequence_value"]
Index is fetched from the counter collection inside our MongoDB collection. During fetch time, it both grabs the index, and also atomically increments the counter collection.
This ensures that every generated sample will have a unique id before being pushed into the database. This id will be the same id that __getitem__ fetched by the dataset class.
b. What is chunkifying doing?
def chunkify(self, data, index):
    chunks = []
    binobj = data
    kinds = self.sample
for i, kind in enumerate(kinds):
        chunks += list(
chunk_binobj(
tensor2bin(torch.from_numpy(binobj[i])),
                index,
                kind,
                self.chunksize,
            )
        )
return chunks
Because MongoDB has a collection size cap of 16MB, we have to chunkify our data into multiple chunks. The size of our chunks is determined by the CHUNKSIZE variable in config.yaml.
Note that because our data is getting chunkified, we’ll have to reassemble them at read time.
2. Get
def __getitem__(self, batch):
"""
    Fetch all samples for ids in the batch and return as tuples
    """
# 1. Get chunk indices of samples from collection given index
    samples = list(self.collection["bin"].find(
        {   self.id: {
"$in": [ self.indices[_] for _ in batch] },
"kind": { "$in": self.sample },
        },  self.fields, )
    )

# 2. Create a batch to store samples into
    results = []
for id in batch:
# 3. Fetch chunks from chunk indices fetched in # 1.
        samples_for_id = [
            sample for sample in samples if sample[self.id] == self.indices[id]
        ]

# 4. >>>> Recreate data from chunks <<<<
        data = self.make_serial(samples_for_id, self.sample[0])
        label = self.make_serial(samples_for_id, self.sample[1])

        data = self.normalize(self.transform(data).float())
        label = self.transform(label)

        results.append((data, label))
return results
In short, to fetch a batch of data from Wirehead, the following operations are executed:
- Get chunk indices of samples from collection given index.
- Create a batch to store samples into.
- Fetch chunks from chunk indices fetched in # 1.
- Reassemble data from chunks.
3. Swap
def swap(self, generated):
"""
    Moves data from write collection to read collection
    Deletes old write collection
    Maintains data integrity in between
    """
    time.sleep(2) # 0. Buffer for incomplete operations
    generated += self.swap_cap

# 1. Rename the write collection to a temporary collection for processing
    self.db[self.collectionw].rename(self.collectiont, dropTarget=True)

# 2. Reset the counter collection, push indices are now at 0 and resumed
    self.reset_counter_and_collection()

# 3. Remove excess chunks from the temporary collection
    result = self.db[self.collectiont].delete_many(
        {"id": { "$gt": self.swap_cap - 1 }})

# 4. Go through collection, and reindex chunks into contiguous sections
#       this operation is O(swap_cap)
#    Also verify that the collection is uncorrupted while you're at it
if self.verify_collection_integrity(self.db[self.collectiont]):
# 5. Atomically replace read collection with temp collection
        self.db[self.collectiont].rename(self.collectionr, dropTarget=True)

# 6. Flag the database as having swapped once and ready to be read
        self.db["status"].insert_one({"swapped": True})

return generated
else: # if collection is corrupted
print("Manager: Corrupted collection detected, skipping swap")
return generated
Once a SWAP_CAP number of samples is in the write collection, a swap is executed which replaces the current read collection with a fresh batch of samples from the write collection. The following operations happen in order:
- Rename the write collection to a temporary collection for processing.
- Reset the counter collection, setting push indices to 0 and resuming.
- Remove excess chunks from the temporary collection, keeping only up to the swap cap limit.
- Reindex chunks in the temporary collection into contiguous sections (O(swap_cap) operation). Also verifies that the write collection doesn’t have any incomplete samples.
- Atomically replace the read collection with the temporary collection.
- Flag the database as having swapped once and ready to be read.
a. How swaps happen ‘instantaneously’
During swap time, the way that data ‘moves’ from the write collection to the read collection isn’t by actually moving any data.
Instead, what we do is we atomically rename the write collection into the read collection, while simultaneously dropping the read collection. This operation happens instantaneously.
b. How swaps happen safely
One thing to note though, is that self.db[self.collectiont].rename(self.collectionr, dropTarget=True) only has partial atomicity — meaning that the renaming operation and dropTarget operation are independently atomic — there is a few milisecond gap during which there is no read collection.
To rememdy this, we’ve also implemented some error handling on the Dataset class to make it able to refetch should a swap happen mid fetch.
def retry_on_eof_error(retry_count, verbose=False):
"""
    Error handling for reads that happen mid swap
    """

def decorator(func):

def wrapper(self, batch, *args, **kwargs):
            myException = Exception    # Default Exception if not overwritten
for attempt in range(retry_count):
try:
return func(self, batch, *args, **kwargs)
except (
EOFError,
                        OperationFailure,
                ) as exception:    # Specifically catching EOFError
if self.keeptrying:
if verbose:
print(
f"EOFError caught. Retrying {attempt+1}/{retry_count}"
                            )
                        time.sleep(1)
continue
else:
raise exception
raise myException("Failed after multiple retries.")

return wrapper

return decorator

@retry_on_eof_error(retry_count=3, verbose=True)
def __getitem__(self, batch):
# rest of the normal __getitem__ function
Footnotes
- unless you want to pay about $300/hour for a time of a radiologist that has better things to do than carefully assigning voxels to 18 classes
- a typical image of shape 256x256x256, at 32 bits per voxel is 64 megabytes.
- https://arxiv.org/abs/2107.09559
- We tried python’s multiprocessing library but found the gains not worth it in exchange for their added cost to complexity.
- https://en.wikipedia.org/wiki/Distributed_computing
- https://en.wikipedia.org/wiki/Circular_buffer
- https://en.wikipedia.org/wiki/Cache_(computing)